11 November 2015

WIP Wednesday - Seeing Red

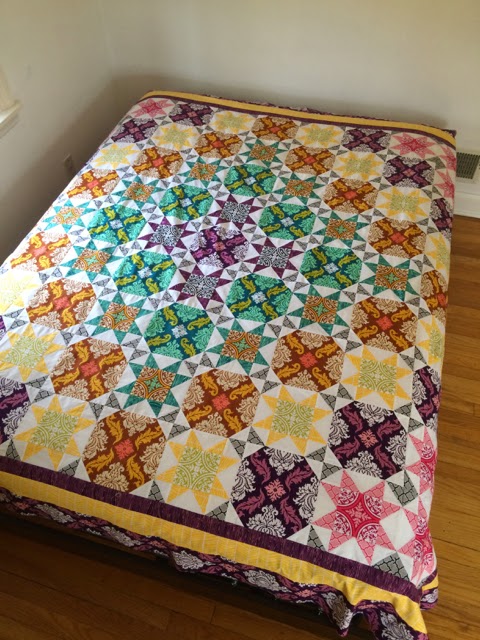
After a great 2 weeks in China for my brother's wedding in September, I spent all of October catching up on work and finishing unpacking from our move. So far, November has been the month of sewing. I am nearing completion on my Paris Flea Market Find Quilt (kit) that is intended for my friend who got married the week before me.  

Layout of 25 patches. My only rule was "no two of the same fabric touching"

I've been using the ironing board as my staging area

I'm currently sewing the blocks into rows and the sashing pieces together. With any luck I'll have the top finished by the end of the week. I have also upgraded my sewing space. For the first time ever I can view my stash without having to dig through a cardboard box. I'm pretty excited ^_^

Top: supplies. Second: WIPs. Third: stash! Bottom: scraps. And on the very top, a plant.


11 September 2015

New Space & Headband

My husband (still not used to that!) and I moved to a new house over Labor Day weekend. As of last night, I have finished unpacking 90-95% of the stuff I was responsible for. Unsurprisingly, I think Brian has unpacked about 2% of the things he was responsible for. 

Anyway, all my sewing stuff has been arranged. All that's left to decide is what to do with the wall space above/behind the table. And maybe get some window treatments so my fabric doesn't get bleached out :)

Tada!

I feel as though there are two reasonable options: design wall or shelving. The main problem I have with using it as a design wall is cats. I'm pretty sure they would pull it down in 10 minutes or less. If I put some sort of shelving up there I could actually organize all my fabric for the first time ever (a big cardboard box doesn't count as organized, no matter how well it is stacked!). Perhaps some sort of hybrid shelf with a bar for hanging finished blocks? Suggestions welcome!

And just to make me feel like I deserve to be in the link up, here is the only sewing thing I've actually done since getting married: a Dolphin's headband for one of the groomsmen. 

Sorry for the terrible mirror selfie, I was testing to make sure it would fit on a head.

Linking to Finish it up Friday at Crazy Mom Quilts

27 July 2015

Happy Anniversary

...to me! I have been married one month as of today and things are finally starting settle back in to something like a routine. My thank you cards are done (at last!) so maybe I can start quilting again. I have quite a queue built up.

The list:

  1. Dolphins headband for Bob - a semi-drunken promise made during the wedding weekend that I now need to make good on. Should be quick and fun.
  2. Repairing the Zumba shirt - my friend's daughter's favorite t-shirt has iron on letters that keep coming off so I'm going to secure them with invisible thread. Another quick project.
  3. Wedding quilt - my friend got married the week before me and I have not even finished cutting out the pieces for her present, oops.
  4. Rainy Wishes - just needs basting, quilting, binding. I have all the supplies ready.
  5. Other - I have at least 3 or 4 other projects in various states of partial doneness. They're not really top priorities especially because I know that working on some of these will just give me more ideas of things to start!

Brian & Libby | 27 June 2015


27 May 2015

How hard could it be?

Really freaking hard! That's how hard. *breathe* and now the backstory.

I'm getting married in a month. Some time significantly earlier in the wedding planning process I thought it would be really cool to make my own ties and pocket squares for the groomsmen to wear at the wedding and then have them be the groomsmens' gifts. I made some test ties with pretty good success and decided that yes, this was feasible.

Practice. I'm shooting for slightly skinnier than the one on the right for the final product.

Yesterday, I tried to make a pocket square. I thought to myself "it is literally a square of fabric with a hemmed edge, how hard could it be?" Famous last words. Turns out, it is way harder than it looks. I only got one side done and it looks like a blind, one-handed monkey sewed it. My new plan is to machine sew it because I apparently cannot hand sew. It is also shockingly difficult to cut out a perfect square of satin. I used my rotary cutter and that was not successful. I'm going to make a square template and use scissors on the rest of these suckers (which honestly seems ridiculous, it's a square for crying out loud!).

It actually doesn't look that bad in this picture.

Like I said, blind monkey.

I really don't want "homemade/handmade" to be a synonym for "kind of shitty" like it so often is (in my opinion). At the same time I am very stubborn so I don't want to give up and buy pocket squares. *sigh* To Be Continued...


08 May 2015

True Colors Complete and Gifted

Last Saturday at about 1 am I popped the True Colors quilt in the dryer. A mere 16 hours later, it was delivered to the intended recipient: my newlywed friends. This was definitely a pinch finish ^_^

I slightly modified my quilting plan because I got some crinkles in the backing. So the middle border was left empty and the smallest inner border got loops instead of matchstick. I felt that trying to do matchstick quilting would exacerbate my crinkling problem. Because I didn't have time to undo any folds that occurred in the main part of the quilt, I stuck the label much further from the edge than usual. It perfectly hides the one serious crinkle I quilted in.

Quilting from the back. From the front it is almost invisible, which is cool.

I am super proud to say I made that label all by myself. I had some really thick interfacing lying around (probably too thick in all honesty) and just went at it with the FMQ foot. Not perfect by any means, but presentable. As I was attaching that label shortly before midnight Friday night, my fiancé was all "you should put a message inside so if the label falls off they'll find it." Of course my first thought was "Shut up stupid face I'm almost done here and no one will ever see it anyway because this label is NOT falling off. EVER." But two minutes later he convinced me to do something which, in retrospect, is super adorable. I put hearts with the couple's and their daughter's initials on them inside right before I sewed down the last side.

Not the best heart shapes ever, but pretty adorable. 

I sent a photo of just the label to the bride Saturday morning wishing her all the best for her big day. She was apparently tantalized all day. On Monday I got the best message ever from her. They loved it so much they took it with to Florida for their honeymoon. Later in the week I got this:

Even their 2 year old loves it!

I'm calling this 100% success, even with the numerous imperfections. Linking to Finish it Friday at Crazy Mom Quilts.

22 April 2015

WIP Wednesday: Plan of Attack

Over the weekend I borrowed a fur-free floor to baste the True Colors quilt. I then spent my whole Sunday morning trying to figure out what I was going to do for the quilting. I spent a fair amount of time cruising pantographs on Google and Pinterest before finally settling on something that seemed doable by combining two of the lovely tutorials over at the Inbox Jaunt. It is a simple all over floral design with a little added punch in the form of swirls and, best of all, easily scalable to an appropriately large size.

The plan and some practice

Armed with an idea and a basted quilt the next step was to find some thread. I was pretty set on a variegated grey for the back (the same one I'm planning to use for Rainy Wishes), but I was extremely conflicted about the front. Luckily my LQS doesn't have a huge selection of quilting thread so I couldn't spend all day debating! On the recommendation of my LQS ladies, I ended up with a variegated pastel. I got some bobbins wound before heading out this morning and hopefully will be able to get started on the actual quilting tonight.

Ready to go!

Enjoy more quilty adventures:


14 April 2015

WIP Wednesday: Cutting and Ironing

As I may have mentioned, my fiancé doesn't sleep well so I try to minimize my sewing machine use in the morning/when he is sleeping. This weekend that resulted in me doing all the cutting for 2 new tops, most of the cutting for another (I ran out of background fabric), and preparatory ironing for a fourth. I only have 2.5 weeks to get the true colors quilt finished so clearly the correct choice was for me to start 4 new projects... Anyway, here they are!

First, a half scrap version of Summer Slice. I say half scrap because there is a polka dot FQ bundle in there in its entirety. My version is going to be a little smaller than the one in the tutorial (I only made 64 of each piece instead of the suggested 80).


Next is something a little more manly, 132 8.5" squares for a Scrappy(ish) Mountain Majesties. This one is also only scrappy-ish because most of the colored blocks come from various FQs that I bought specifically when my friend requested I make him a quilt. All of the background fabric is technically leftovers though so I'm sticking with scrappy-ish. I have been agonizing and changing my mind about what to make for my friend for the last 2 years. Then a week or so ago Kat at Kat and Cat Quilts posted her own Scrappy Mountain in progress and everything just fell into place. Don't you love it when that happens?


Number three is another girly quilt, this time not scrappy at all. I'm using the Country Home Pillow Cover pattern to make blocks for a quilt. The current plan is 12 blocks, two of each fabric. I got 5 out of six of these half yard cuts on one of those end of season sales at like fabric.com. They're from Summersault by Erin McMorris for Freespirit Fabrics. I ran out of the Kona black I'm using for the background color so this project will be shelved for an extended period of time until I replenish my stock.


Last, but certainly not least, I ironed and arranged all the FQs (purchased ages ago as a bundle because I love blue) for what I'm calling Triangle Beach. I'll leave exactly what that is going to entail up to your imagination for now... :P


07 April 2015

True Colors Kit Deviation and Rainy Wishes

I have two completed tops to share this week so it's both a finish and a WIP. First is the Rainy Wishes top. I did a lot of rearranging of these blocks and I am pleased with the final layout, more or less ^_^

Rainy Wishes top complete!

I also am super happy that I decided to change up the True Colors pattern. I ended up having to order an extra half yard of the white background fabric and a fat quarter of the pink for the centers of the stars in order to expand the pattern, which is not bad considering I increased the quilt size by about 20%.

Now it's a queen size

I really really lucked out and had enough of the purple left to fussy cut that outermost border and miter the borders.

Mitered corners!

For finishing, I have a grey flannel for Rainy Wishes and intend to use a variegated grey for the quilting. I don't know what I'm going to do for binding. Maybe a solid blue? Maybe scrappy and just use up every last bit of this fabric? I got a light gray and white swirl in a 108" wide backing for the True Colors kit and I'm either going to use the suggested purple woodgrain as the binding or a solid black. I have no idea what kind of thread or quilting to do at all and I only have about 3 weeks to figure it out!

Backings and a potential binding ready to go...


Finish it Friday at Crazy Mom Quilts


27 March 2015

Hexagons for Baby - Finished!

I made my goal of finishing and mailing out this cute little blanket by the end of the week. I just dropped it off at the post office so it is on the way to its new home in lovely Kobenhavn.

I totally cheated and just copied the quilting from my inspiration quilt using a variegated grey for the front and variegated beiges for the bobbin. I apparently have no shame.

All done! Finished size is about 38"x41"

I used a solid cream/beige flannel for the back since I don't know if the baby is going to be a boy or a girl. And I did a super speedy machine binding in black with a teal flange.

I just noticed that the back matches the neutral hexies on the front almost perfectly.

I'm glad this is done so I can focus on my other friend's wedding quilt: 36 days and counting!


25 March 2015

WIP Wednesday: Hexagons and Rainy Wishes

I have three projects in progress right now but only have stuff to show on two of them. The first is my Wishes QAL one that I've decided to name Rainy Wishes. Originally, I wasn't particularly pleased with some of the blocks. However now that they're all done I've decided that I'm not going to redo any of them, I just rearranged them a bit from the layout suggested by the pattern. I've made all the borders and everything for this top I just need to put it together and then I can think about quilting...

Potentially the final layout

The second quilt is Hexagons for Baby. After seeing this beauty on WIP Wednesday a couple of weeks ago I completely redid my plan for this quilt. Now the top is together and I am sooooo happy with my decision to make something different. My friend's baby is due in April and I still have to mail the finished product to Denmark, so I want to try and finish this up by the end of the week. I'm still trying to decide if I want a border and what kind of binding I should do.

Rocking the design floor

Linking to WIP Wednesday at Freshly Pieced


23 March 2015

A Good Team

Over the weekend I went to my cousin's engagement party and gifted him a quilt that was a joint project between my mom and I. Two weeks ago she dug a finished top out of her (apparently extensive) pile and mailed it to me. Then I got backing, batting, binding, and quilted it up last week. Finished size is approximately 65" square, so a nice lap size.

Apparently my mom made this as a block of the month type thing

My mom's piecing is way better than mine, probably because she's had a lot more practice. However, she doesn't do most of her own quilting and she never does FMQ so I'm better on that end. Basically we're a perfect team.

For quilting, I did a combo of straight line and FMQ in a variegated tan/cream thread

I have to admit I don't love the color scheme of this quilt, the fabrics aren't really my style. But I do like the layout. My mom actually said she wanted it back after I sent her this pic of the quilting. So yeah, for a last minute gift, I think we did pretty damn well ^_^

A close-up of the quilting from the front


04 March 2015

WIP: Wishes QAL

Last year the Fat Quarter Shop had this cool Wishes QAL. At the time, I wasn't doing much quilting so I didn't join in but I did diligently collect up the patterns each month and ogle the Flickr group. Also some time last year I got a FQ bundle from Connecting Threads featuring rain themed fabrics (I think it's called Soaked by Jenni Calo) because I thought they were super cute and just couldn't resist.

This is the order they're supposed to be in but I don't love it

The time has finally come to put my impulse buy and QAL longing together to make my very own Wishes quilt! So far I've done half of the blocks and I'm happy with 4 out of 6.

Left: Blech. This block lacks punch. Right: Was I drunk when I sewed this? Those points are nowhere near aligned

I'm a little disappointed in my fabric choice for block 3 Annie's Choice, I should have gone for something darker for the middle and used the lightning bolts in place of one of the grays. And somehow only 2 sides match up in block 6 Susannah. Apparently I'm having trouble with quilt blocks named after people...

I'm hoping to finish this one up tonight after work.

Number 8 Mrs. Taft's Choice is up next. I skipped number 7 Court House Lawn for now. Please don't hate me quilt block named after a person!!


02 March 2015

New Plan

So last week on WIP Wednesday I saw this and immediately decided that my previous layout for Hexagons for Baby was complete garbage. I already kind of didn't love it and luckily I hadn't actually sewn any of those hexies together so now I have a new plan and I'm super stoked for it!

Soooo much better!

This is going to have a very dark grey as the zigzag between the rows. The only problem now is that I have some extra hexagons (about 13) that I don't know what to do with. I guess they'll go on the back? Whatever, I'll figure it out later.

25 February 2015

WIP: To Deviate or Nah?

Last weekend I put in some time on the True Colors quilt kit. It is all together except for ironing and borders. This is the point where I need to decide if I should deviate from the pattern and do something to make it bigger or just go with it and be done.

According to the pattern this will finish at 74"x90" which seems a little small for a queen

If I go with the pattern there will be an additional 9 inches of borders on each side, which may be enough for me to feel like it really is queen size... Or at least would cover the mattress.


04 February 2015

WIP: Kit Work

Recently I've been trying to watch my waistline so that the wedding dress I bought back in August will still fit me in June. Towards this aim, I ditched Superbowl Sunday in favor of Sewing Sunday. After taking the beast for a romp in the snow, I spent a good 6 hours working on the True Colors quilt kit.

Echo really loves giant fields of snow. And cornstalks.

I made all the HST corner pieces and the flying geese units for the stars. Everything is ironed and ready to be made into blocks.

To trim or not to trim? That is the question...

I'm undecided if I'm going to trim things up before I make the blocks. The instructions don't have anything about trimming, I don't usually trim anything (which may explain my terrible point alignments...), and I would really hate to mess it up this far along. Suggestions?


28 January 2015

WIP: Hexagons for Baby

I have a friend that is having a baby in April. I want to do a hexagon quilt for her/the baby and have just started auditioning layouts. I'm cheating and using all pre-cut hexagons. My biggest concern is that the baby's gender is unknown and this honeycomb is kind of very pink. Hopefully Europeans aren't as hung up about baby color as we are here in the US...

The original design doesn't use all the hexagons

Maybe I could make a panel for the back or even a second, smaller quilt with the leftovers?

This layout uses all but 4 background hexies. Assuming I can get two corners from one hexie that is...

Decisions, decisions. I'm also considering some other arrangements that I haven't physically laid out yet. Like diagonal stripes and clusters. Linking to WIP Wednesday at Freshly Pieced.